Web中的Cookie机制
Cookies
a small piece of data stored in the browser for a website, key-value paires, 20 Cookies per website
Browser                 Server
    |   --- login --->    |
    |                     |
    |    {uid = 1234}     |
    |   <--- Cookie ---   |
    |                     |
    |    {uid = 1234}     |
    |   --- Cookie --->   |
    |                     |
    |   <--- User Data--- |
    |                     |
Cookies are sent in HTTP headers, something like this:
HTTP Response
--------------
set-Cookie: user_id = 12345
set-Cookie: last_seen = Dec 25 1985

HTTP Request
-------------
Cookie: user_id = 12345; last-seen=Dec 25 1985
我们可以实际查看一下Server返回的Cookie
➜  curl -I www.google.com
HTTP/1.1 200 OK
Date: Mon, 06 Aug 2018 02:08:03 GMT
Expires: -1
Cache-Control: private, max-age=0
Content-Type: text/html; charset=ISO-8859-1
P3P: CP="This is not a P3P policy! See g.co/p3phelp for more info."
Server: gws
X-XSS-Protection: 1; mode=block
X-Frame-Options: SAMEORIGIN
Set-Cookie: 1P_JAR=2018-08-06-02; expires=Wed, 05-Sep-2018 02:08:03 GMT; path=/; domain=.google.com
Set-Cookie: NID=136=CCO0I2iLHXevLQ9iTtMQcUOKDRmByXVIPRmrnW-6i6b59ZcCDiTASvbns6Dc9C7Sq39qg4wsF3WJ88zwNj2DC27dE2kshTSuE9KSsOsW00Xbhgnyn6ZY4QnJHdCEZNZc; expires=Tue, 05-Feb-2019 02:08:03 GMT; path=/; domain=.google.com; HttpOnly
Transfer-Encoding: chunked
Accept-Ranges: none
Vary: Accept-Encoding
Hash Cookies
常用的Hash函数有,CRC,MD5,Sha1,Sha256,其安全性由低到高,Hash的速度由快到慢。Python提供了一些常用的Hash API
import hashlib
key = "udacity"
key = key.encode('utf-8')
x = hashlib.sha256(key)
x.hexdigest() #
可以使用Hash来校验Cookie,假设Cookie的格式为{visits | hashcode}其中visits表示访问Server的次数
#Server
#-----------
#set-Cookie: {5|e4da3b7fbbce2345d7772b0674a318d5}

#client
#-----------
#Cookie: {5|e4da3b7fbbce2345d7772b0674a318d5}

# check Cookie
def hash_str(s):
    return hashlib.md5(s.encode('utf-8')).hexdigest()

def check_secure_val(h):
    val, hashstr = h.split('|')
    if hashstr == hash_str(val):
        return True
    else:
        return False
上述Hash Cookie的方法任然有一个缺陷,就是可以被伪造,例如可以将{5|e4da3b7fbbce2345d7772b0674a318d5}替换为{123|202cb962ac59075b964b07152d234b70},校验仍然有效。
可以对上述方法做个修改,在计算hash时,加入一个secret key
Hash(secret_key,Cookie) = hash_code
Python的hash库中提供HMAC(Hash-based Meesage Authentication Code)的API来应对上述场景
secret_key = bytes([0x13, 0x00, 0x00, 0x00, 0x08, 0x00])
Cookie = "some_Cookie".encode('utf-8')
hash_code = hmac.new(secret_key,Cookie).hexdigest()
#f2b280549c1c9edb18d5500d6c01ea51
使用Cookie
上面介绍了服务端如何生成Cookie,这一节介绍浏览器如何使用Cookie。RFC6265定义了Cookie的一些属性,包含Expires、Max-Age、Domain、Path、Secure、HttpOnly等。这些属性决定浏览器是否接受Server端传来的Cookie
对于浏览器来说,Domain、Path、Name三者唯一确定一个cookie。在浏览器在使用cookie时,不区分Http/Https和端口号。
- Domain是向上通配的
#写入(Set-Cookie)访问www.example.com
Set-Cookie: sid1=a; domain=example.com; path=/; #接受
Set-Cookie: sid2=b; domain=www.example.com; path=/; #接受
Set-Cookie: sid3=c; domain=pay.example.com; path=/; #拒绝

#读取(Cookie)
#访问pay.example.com
Cookie: sid1=a

#访问www.example.com
Cookie: sid1=a; sid2=b;
- Path是向下通配的
#写入(Set-Cookie)

Set‐Cookie: sid1=a; domain=example.com; path=/;
Set‐Cookie: sid2=b; domain=example.com; path=/test/;

#读取(Cookie)
#访问http://example.com/
Cookie: sid1=a;

#访问http://example.com/test/
Cookie: sid1=a; sid2=b
Expires、Max-Age可以指定Cookie的有效期,不指定有效期时,Cookie默认为当前session有效,当前session有效指关闭浏览器时Cookie失效。
Cookie的安全问题
如何盗取Cookie一直是一个热门且重要的安全问题,常用的攻击手段有中间人拦截,XSS,CSRF等等,关于这部分内容和本文主题无关,我们将在后面一篇文章中重点讨论Web Security的问题。
OAuth 认证
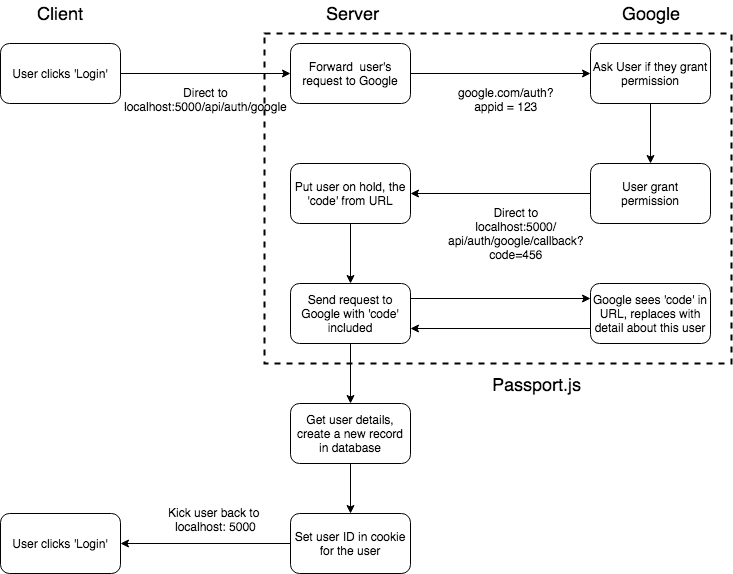
有了前面Cookie的铺垫,我们可以谈一谈目前比较流行的OAuth认证。所谓OAuth是指使用第三方平台账号进行认证,其认证流程图(以Google为例)如下
上面的认证过程分为两部分,一部分是从Google获取登录信息,一部分是将得到的登录信息进行处理,生成Cookie,存到自己的Server上。第一部分的任务流程相对标准化,基本上每个平台都有相应的三方库支持,比如Node.js可以使用Passport(图中虚线部分)
Passport由两部分构成,一部分是Passport核心库,用来处理登录逻辑,另一部分是passpoart strategy用来支持各类登录策略,比如JWT,OAuth等等。上述两个framework分别为
npm install --save Passport Passport-google-oauth20
Config Passport
我们以Google的OAuth认证为例,介绍如何使用Passport完成OAuth流程。首先需要对Passport进行初始化:
passport.use(
  new GoogleStrategy(
    {
      clientID: keys.googleClientID,
      clientSecret: keys.googleClientSecret,
      callbackURL: '/auth/google/callback'
    },
    accessToken => {
      console.log(accessToken);
    }
  )
);
上述代码初始化Passport,传入client_id和secret以及callbackURL,注意callbackURL需要在Google Account中预先配置好,当OAuth请求成功后,Google会使用这个URL返回token。接下来,在Server上配置OAuth登录API:
app.get(
  '/auth/google',
  passport.authenticate('google', {
    scope: ['profile', 'email'] //允许访问用户的profile和email信息
  })
);
此时,当我们访问/auth/google时,Passport会将上述GET请求的URL替换为:
https://accounts.google.com/o/oauth2/v2/auth?response_type=code
&redirect_uri=http%3A%2F%2F127.0.0.1%3A5000%2Fauth%2Fgoogle%2Fcallback
&scope=profile%20email
&client_id=999661698345-ivms5t1s778qp5n4k55sep4odp7t4her.apps.googleusercontent.com
当请求OAuth请求成功后,Google会调用callback URL,因此我们需要处理该请求的回调(Passport内部会通过URL中是否存在code字段来区分该请求是否是callback请求)
//callback API
app.get('/auth/google/callback', passport.authenticate('google'));
此时,我们再访问/auth/google,选择一个账号登录,Google会通过callback URL返回登录信息和用户信息,用户信息中重要的是用户id,我们后面会用这个id来生成Cookie
//token
ya29.GlsgBiHIcv4rAhcYaxNkAn7nJadfm1oNQpCbnz1FO3QczeEke9zdWGc0ZExklr0b6WSJVQEuv_x6oe_cH5YAYrj9cNXeLWLjo3ATvZ_0pM0agI4_ju8-KxhUxIkhG

//user profile
{ id: '1128784079818168156265',
  displayName: 'JOHN DOE',
  name: { familyName: 'DOE', givenName: 'JOHN' },
  emails: [ { value: 'johndoe@gmail.com', type: 'account' } ],
}
Cookie Management in passport.js
通过OAuth拿到登录信息和用户信息之后,我们就可以为用户生成Cookie,这个过程同样也是被Passport在内部封装了,我们只需要在代码中做一些简单的配置即可。首先初始化Passport中间件:
//Cookie
app.use(
  CookieSession({ //CookieSesssion
    maxAge: 30 * 24 * 60 * 60 * 1000,
    keys: [keys.CookieKey]
  })
);
app.use(passport.initialize());
app.use(passport.session());
CookieSession是一个用来从生成以及解析Cookie的三方库,参考前面一节对Cookie的介绍可知我们需要在Server上放一个私钥同来对Cookie进行非对称加密解密。
接下来,当OAuth请求成功后,Passport会调用之前注册的回调函数
(accessToken, refreshToken, profile, done) => {
    const googleId = profile.id;
    //Get user from mongoDB
    User.findOne({ googleId }).then(user => {
    if (!user) {
        new User({ googleId }).save().then(user => {
        done(null, user);
        });
    } else {
        done(null, user); //if found user, save it
    }
    });
}
在回调函数中,我们从DB查询user并将得到的结果会传给Passport,这一步很关键,Passport会使用user中的内容来生成Cookie并返回给Browser。
passport.serializeUser((user, done) => {
  done(null, user.id); //{Cookie, user.id}
});
上面代码中指定user.id的意义在于告诉passport,在后满的通信中使用user.id作为通信的session。后面的内容还会提到这个session的作用。
至此,OAuth认证的完整流程就走完了。接下来,当用户的Browser已经存有当前Server的Cookie时,如果该用户再次访问,将走下面的流程:

此时当Server收到请求后,CookieSession会先解析出Request Header中的Cookie,然后Passport会根据解析得到的Cookie找到对相应的user,然后将user绑定到req.user,将user.id绑定到req.session上。
虽然整个过程逻辑上说的通,但是这里有一个疑问,就是Passport如何根据Cookie找到对应的user的。能想到的是,一种做法是将Cookie存起来,其中key为Cookie的值,value为user.id。当有请求到来时,首先根据Cookie找到user.id,再根据user.id去获取user其它信息。但是我们并没告诉Passport在哪里存Cookie,显然上述过程使用的不是这种方式。
另一种方式则是不存放Cookie, 而是将用户信息user通过某种方式encode到Cookie中,成为Cookie的一部分。当用户带着Cookie访问时,从Cookie中decode出来,显然上面的过程使用的是这种方式。
在Node.js中第一种方式对应express-session库, 第二种方式对应cookie-session库
上述两种方式各有优劣,选用那种方式要看实际应用场景,如果是大规模的分布式系统,用户数据很庞大,建议使用第一种方式;如果是轻量级的小应用,user信息不复杂,则可以使用第二种方式。

